Advertisement


Jeremy Hack: Debunking "Blurry Photos" and what you may be doing wrong

Have you found yourself drafted into taking photos at the family reunion or a ball game only to find the memory card littered with "Blurry" photos? If so, you may find useful information in this article. Before continuing, please note that blur can certainly be used in advantageous ways. Photography can be a very subjective art- This article is for those that wish to avoid unwanted blur in their images.
Blurry images have many causes in photography. I will cover the three primary causes of blurry images and how to avoid them. The first blurry image culprit is improper shutter speed. You will often hear me preach the gospel of proper shutter speed. Shutter speed is incredibly important to me as a sports photographer, yet it's one of the easiest photographic terms to understand. So what is shutter speed? Well, inside the body of the camera is a set of actuators that open to expose the camera sensor to light. It then closes, finishing the exposure and saving the image to the card. The amount of time that the shutter is open to allow light to reach the sensor is called the shutter speed.
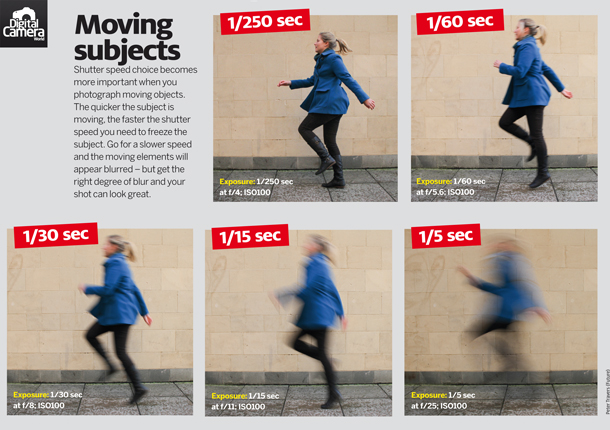
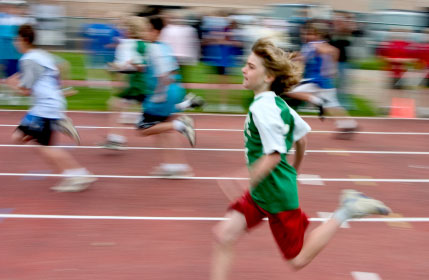
Shutter speed is partially responsible for the amount of light being let into the camera. The lower the shutter speed, the longer the exposure is open to light and the higher the shutter speed, the less time the exposure is open to light. It would make sense to say, "Well it's pretty dark at the football game, so I'll need to lower my shutter speed so the camera will get a bright enough photo." However, in the case of the football game, that wouldn't be wise. That's because the players are moving so rapidly that their position can change within 1/400 of a second. If you have the shutter open for 1/60 of a second and the players move 3 feet by the time the exposure is finished, guess what will happen? That's right, our first reason for blur in a photo. To remedy this, you'll need to adjust the other settings until the exposure is bright enough without a slow shutter speed. This may consist of boosting ISO and using a lens that has a larger aperture.
Another common reason for blurry images is the old-fashioned improper focus. What creates focus is the convergence of light beams gathered from a particular focal length being bounced back onto the film/sensor. When the particular space you have in focus doesn't cover the subject, they appear blurry. The reason I say improper focus is because while the desired subject may not be in focus, I guarantee that something else is. There is really no way to simply explain focus- the subject is either in focus or it isn't, and having that focus right can make all the difference. I can offer no remedies to resolve this, as it comes with patience and practice; there is no magic button that will guarantee perfect focus every time. However there are different focus settings within the camera that will make it easier. The standard auto focus (AF) mode in Canon DSLRs (and I assume the same technical principles apply to all other professional DSLR cameras) is one shot AF. One shot AF sets focus based on the reticule and will hold that focal point regardless of anything- that is until you release the focus button and reset it. The second AF mode is AI AF. AI (Artificially intelligent) auto focus will remember the visual patterns in the subject you are focusing on. You can pan the camera left and right and the focus will not change, but as the subject comes near or goes far, the focus will change to follow them automatically. The third AF mode is called AI Servo. AI servo focus will constantly update focus when any movement whatsoever is present in the frame. This is my preferred AF mode when shooting. I plan to write a much more technical piece with regard to focus and aperture in the future.

The third and final pitfall we will cover leading up to blurry images is something that I'm guilty of myself. This pitfall is called condensation. This one is very self-explanatory. The camera lens is basically a tube of glass. When you have had the camera in your 68 degree car while driving to shoot a volleyball game in 90 degree weather, expect condensation to appear on the lens. Condensation occurs because warm air stores more moisture than cold air. When warm, moist air contacts a cold surface, the warm air begins to cool thus losing it's moisture holding capability. This moisture moves to the cooler surface (your lens) as condensation. Always checking for condensation may seem like a no brainer, but when balancing all other aspects of taking photos it is easy to overlook the most elementary of things. You can purchase special cloth that is engineered to clean camera lenses without microscopically damaging the surface. Another tried and true way to resolve this problem (if you have time) is to let the condensation naturally dissipate as the temperature of the camera and lens acclimate to the ambient temperature.

The next time you are out and about at a local sporting event, try switching it to either manual or shutter priority mode. You may not get acceptable photos on your first adventure, but learning the settings and how they each impact an image is crucial to delivering outstanding work that is based on proper focus, proper shutter speed, and no condensation fog. Stay tuned for my next article speaking on all the ways that blurry can be a good thing.
- Log in to post comments
![]()
Advertisements


Clicking on an ad will open the advertiser's web site or a larger view of the ad. Advertise with us!
Advertisements